Good morning and how is everyone doing, enjoying that first cup of tea or coffee of the morning I hope. Myself, I am a tea person, always have been, my Irish nature, we drink it by the liter. Can’t beat a good of tea in the morning to revive oneself. And if it’s the afternoon or evening, well I hope you are still enjoying a caffeinated, or decaffeinated beverage, your choice. Man, what a week. From the blogs, a kind individual/individuals anonymously sent me a set of toy dinosaurs to play with, so have been having immense fun with my new set. I will add a photo in my next blog to show you my collection, it really is impressive, I just need the right lighting. So, I survived another Monday, always a slog. It always feels like I run at 20% Monday and about 100% Friday, go figure. But survive I did, and now we are ready for the next installment of my fun with Tom blog, looking at how to thaw iPSCs.
For those who didn’t read the last installment, our list of reagents is online, free to download for anyone interested. Today, we have now added our iPSC passage SOP, and for explaining what we do, I will break it into two parts. The first part today I will discuss how to thaw your iPSCs, and then on Thursday (Yes, Thursday, you are getting two installments of me this week, contain yourself, when down in the cottage this will be a must read) I will go into iPSC passage, freeze down and have a special surprise for you all at the end, and no its not a pony.
So, fun and games are now over, lets get down to business. Here are your five easy steps to thawing and growing your iPSCs, these points will be short, and all the details can be found in our online SOP.
Coating of dishes: For growing our iPSCs, we use a matrix to grow the cells, and the preferred choice for our group is matrigel. There are other alternatives out there, and some groups even prefer to use feeder layers, in which your seed a layer of fibroblasts, followed by seeding your iPSCs. All have their plus and minus points. Matrigel is far from perfect, but the critical thing to remember, is keep it on ice at all times. Thaw on ice. Keep the media you suspend it in on ice, even the tips you use, keep in the freezer. You want to prevent it from gelating until you have added it to your dishes. Once added onto your dish, which for thawing cells is a 60mm dish, swirl around to coat the plate evenly and place in your cell culture incubator for at least 1h. People vary times for coating, etc; but our standard is always a minimum of 1h in the incubator.
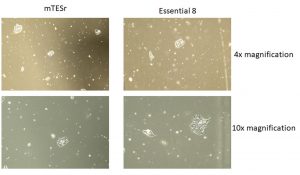
Warming of media: While your plate is coating, you need to warm your media. But iPSC media is special, unlike regular old cell culture media where you warm it in a 37 degree celsius waterbath, the media that is used in iPSC cell culture, which for us is either mTESr or Essential 8, is warmed at room temperature. More details on working with mTESR and Essential 8 in our SOP.
Warming of cells: The time has now arrived. Thawing the cells. The nerves are high, so breathe slowly, you got this. Once you remove your tube of cells from liquid Nitrogen, place it in a small liquid Nitrogen container, or on dry ice to bring the cells into the culture room. The next part is done quickly, remove the frozen tube and gently shake continuously until only a small, frozen cell pellet remains. Transfer the cells from the tube into a bigger tube, containing some media and spin down to pellet your cells.
Addition of cells to plate: Don’t fret, your almost there. Once the cells are pelleted, remove the old media, add some fresh media, and voila, after some careful pipetting, add in a dropwise fashion onto your coated dish. Before you do, make sure to remove any matrigel containing media from the plates. Now put the cells back in the incubator, toss your lab coat onto its hanger (wait, no stop), clean up after yourself. And now you are breezy, free to do whatever you wish, all while waiting and hoping the next day brings new hope, or in this case, cells growing and attached onto your dish.
Check Up on cells the next day: It has been a rough night, you barely slept a wink at night dreaming about your cells, don’t believe me, I have spent roughly 1562 nights dreaming about my cells during the course of my scientific career, its like counting sheep, why do you think I look about 70 years old. You open the incubator, put the cells on the microscope, and success. The cells have attached, they look great as shown below.
Now they are ready for the next step in their journey. Which is
TO BE CONTINUED. Cue exit music.
I kid, I kid, Tom has not left the building. The rest comes Thursday outlining how to maintain cells, pass cells and freeze cells, all must have skills if you want to be an iPSC master.
So, thanks for reading. Hope you join me again next time. I am off to practice this thing called walking, am doing a Parkinson’s super walk in September as my group along with Dr Fon are doing a battle of labs to raise awareness and fundraise for Parkinson’s research. So, if you are Parkinson’s lab in Canada, sign up and just bring it. As it will be brought from our side, and it all goes to a good cause.
Ok, enjoy your day and see you all Thursday again as we continue our journey with stem cells and dinosaurs into the EDDU.
Honestly this is a really helpful reading plus is funny because it describes how nervous you can be working with iPSC for the first time. Love the blog posts. Thank you for sharing!